The problem is that with the heavy gauged, silver-plated Mil-Spec wiring that I use, I have to sacrifice flexibility for improved electrical conductivity, which I'm fine with. So, it doesn't really make it feasible to just install the MOSFET and then just shove it into the buffer tube so that you can get the stock back on because the wire is not very flexible and I don't want to jeopardize having one or more of the wires come loose from the MOSFET. They are a huge PITA to deal with since they are just slightly too large for the screw clamp connectors that this MOSFET uses and if not connected properly, they will easily come loose which is an obviously less-than-optimal situation. After a bit of brainstorming, I came to the conclusion that if I just carved out a piece of that buffer tube so that I could connect it or disconnect it while it was still technically inside the tube, I would essentially have solved the problem at hand.
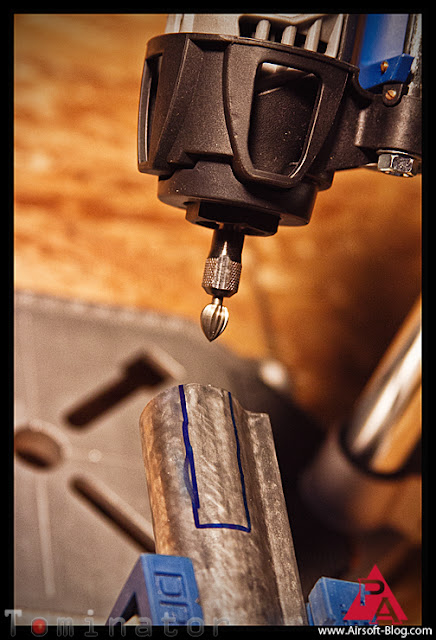
The first step was to trace the exterior of the MOSFET on the buffer tube so that I would know how much material I would need to remove from the buffer tube.
Here, you can see the result. Enough to access the MOSFET but not enough to jeopardize the structural integrity of the buffer tube and/or render it otherwise unusable with a stock mounted on it.
Below, you can see some of the tools I used to make this thing happen. Number one, please note the safety gear I have pictured on the right. Yes, I know those are ESS Profile Turbofan goggles and are not your typical power tool eye pro, but think about it. They're ANSI-rated to take a shotgun blast at close range. Why wouldn't they make for good power-tool eye pro as well? Riddle me that, my dear trolls.
 |  |
Then I cut that biyatch.
Here is the result. Boom.
Nice and neat. I can still access all the screw clamps to connect or disconnect the wires from the MOSFET and I'll still be able to put my stock back on and collapse it down to at least the 2nd to last position. If you'd like to be able to collapse it all the way down for whatever reason, then I would recommend cutting a bit further into the tube (to the left, in the photo above) to allow yourself a bit more room on the right side of the MOSFET (in the photo above) because you need to take the wires on that side and how much room they'll take up into consideration. While I don't have it pictured there, I am just going to keep the wires that connect to the battery on the right side there super short. Like, basically, I would terminate them right about where the right edge of that photo starts and the wires go out of frame. That should be plenty, assuming you've got a little bit of length in the wire on your battery as well so that you can keep that battery in a crane stock tube, if you have one, or however else you store your battery while connected to your gun (e.g. battery pouch, electrical tape, etc.)
![[PT]Airsoft - News](https://blogger.googleusercontent.com/img/b/R29vZ2xl/AVvXsEjekwQN8PZ8Aeu2Po4KbDUeQqiHVcLwA5XZYsIC-gMVpCd3zxxnc4cMLo44twub9haKWlaQ0ZJ4JSptZ42LO-wK7i71vN3_aNdRkHGfZJ54ObqgNMSmtnacyz_xR0SE2gYlWXAS6iJgeNo/s1600/blog_logo.png)


Sem comentários:
Enviar um comentário